The Mushroom of Love
also called
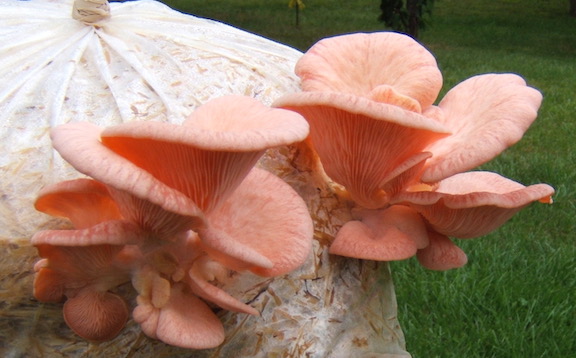
Pink Oyster Mushroom
Pleurotus d'jamor
(also known as)
Pleurotus flabellatus
The pink oyster mushroom is the perfect choice for the
first-time mushroom cultivator. It grows at room temperature and
anywhere warmer. Members of our cultivation group have used many
different cultivation methods, and the only one that actually
killed the mushroom was direct exposure to the sun and drying in a
hot house.
How to grow Pink Oyster Mushrooms on a block of straw
If there are no holes in the bag, poke some now. Keep the straw
block in a warm place. The mushroom of love prefers 60° or warmer.
Keep the straw moist, but not wet. Water droplets in the bag are a
sign to back off on the amount of water. You may spray water on
with a pump bottle or just pour water into a hole you cut in the
top. You may remove the bag, but it will be harder to keep the
straw moist unless you put it in a plastic tent. This is
unnecessary, but I do it to increase yeilds on my first flush.
Frequently Asked Questions
How many holes should I cut in the bag? -- Bill Chalmers
says to poke 50 holes with a clean nail. Paul Stamets' book
"Growing Gourmet & Medicinal Mushrooms" has a photograph
showing fewer, larger holes. This leads to the formation of
clusters. Ten to twelve holes the size of a 50¢ coin are enough
for the 18x24 inch bags we use if you want clusters of mushrooms.
I have removed the plastic bags completely. The mushrooms in the
photo above were the result of that experiment.
Do I need to water them everyday? -- Once holes are cut
in the bag, yes, it is a good idea to keep them moist. If you
notice water droplets inside the bag, you have been watering too
much; stop for a few days.
Why don't we grow portabellos? -- The myconerds that I
rely upon for guidance think they are boring. They require the
composting of a large pile of manure and straw, and so far, we
don't have a place to do the composting. Perhaps one of our group
or someone who would like to join the group will offer a
composting site. If that happens, we can try them. They can be
purchased locally, so there is not the incentive to grow them that
there is for Oyster mushroom varieties that are not available
locally.
Am I guaranteed success if I follow these instructions?
-- No, this is a fungus. We take every precuation to pasteurize
the substrate (straw) and to introduce only the fungus whose
fruiting body we hope to harvest. Your success will depend on the
quickness of the capture and the presence or absence of
competition. The P. flabellatus is quite competitive, and usually
wins in a fungus to fungus duel to the death. As surprising as
this sounds, that is fun to watch. Of course, my fungus won.
Otherwise it wouldn' t have been so much fun.
Are these good to eat? -- Yes.
Can these be grown outside? -- Yes, if it is above 60°.
Are there disadvantages to outdoor cultivation? -- Yes.
Flies lay eggs (that become maggots) in the fruiting bodies. Wild
creatures may sample them before you get the chance.
Can this cultivation kit be expanded to new straw to make
more kits? -- Yes. Success depends on how clean and complete
a capture you have with the kit, and the age of the mushroom when
it was expanded into the straw. If you want to do that, check with
the kit's cultivator to see how many times that particular
mushroom has been expanded before expending the effort to use it
for spawn. The cost of new, vigorous, spawn is only about $15 per
bale of straw. The largest cost is labor to assemble them.
What is the white fuzz inside the cultivation bag, and what
should I do about it? -- It is mycelium. Rejoice!
But it looks like mold! -- Yes, it does.
My straw block has turned white. What are the pink bumps that
are forming? -- They are primordia. Each bump will try
to become a mature fruiting body. Some will abort.
Do they need light? -- No, I have grown them successfully
in the dark. Light does encourage primordia formation. When
growing mushrooms for market days, I increase light and fresh air
a few days before so there will be lots of mushrooms on market
day.
Will chlorine in my water kill the mushroom? -- No,
because like all good cultivators, you will leave the water out
overnight in an open container to allow the chlorine to evaporate
before you spray it on the mushrooms.
Some of my straw blocks have a peculiar problem. They start
to fruit, then when the cap is apout the size of a dime, they
get covered with dozens of primordia. The blocks have hundreds
of pins, and no mature fruit. The other two blocks are fruiting
nicely. They are all sitting on the same table top! --
"overpinning" can be a result of too high CO2 (pinning under the
plastic can cause this or simply not enough ventilation - of
course the requirement for ventilation increases with
temperature). Excessive temperature shock can result in
overpinning. You can sometimes get an effect like that if you pin
before the substrate is fully colonized. That may result in many
small fruits but it will not cause the coral-like multi-branched
effect which is virtually always the consequence of poor
ventilation - high CO2, and aggravated by high humidity. I can't
really tell you how you can interpret those symptoms to your packs
made and incubated "together." .....reply..... Yes, given
the conditions in my grow room, the overpinning was caused by
excessive CO2, high temp., and not enough ventilation. The two
that fruited were closest to the air source.....
Cooked some oyster shrooms last night. Awesomely beautiful
but not that tasty. Kinda tough as well. Is that just the nature
of the beast or is it the cook. I'm a pretty good cook. Any
ideas??? I'll grow em just for the beauty if I can't find a
better way to eat em. Any way thanks for selling em to me. I
grow mushrooms that taste better. The most frequently requested
species for flavor by my farmers' market customers is the Blue
Capped Oyster Mushroom. As for the Pinks; they make wonderful
soup. Cooked hard, they become more flavorful and crunchy. I use
olive oil to fry them. Here are three suggestions:
Fry them 'til well done in oil with onions and garlic, then
scramble eggs into them.
Dip them in crispy batter and deep fat fry them.
Crush garlic into olive oil and paint the gills of upside-down
clusters and bake at 375 'till golden brown. Just don't eat them
raw. Uncooked, they are indeed tough, bland and not easy to
digest. Like most mushrooms, they have milder flavor in the button
stage. These get 12 to 15 centimeters across when mature. Pick one
the size of your hand, and see if it is more flavorful. The second
and third fruitings may have fewer clusters or even single fruits.
These are more likely to grow large than are mushrooms that are a
part of a dense cluster. In any case, if you are patient and let
them mature, they will produce spores. Put newspaper or plastic
down to catch them. You may get millions and millions of them.
Don't count on cleaning them off anything easily. They are 3x10
microns and ornamented.
Thanks for getting back to me. Unfortunately, I am not in
your area and cannot make any of your meetings. However, I am
interested in staying in touch and learning as much as I can
about mushroom cultivation. As a novice, I am particularly
interested in putting together a mushroom cultivation kit for
myself. Could you share with me what I would need and how to go
about it?Thanks again.--Yes. See my reply to the inquiry
below.......
Lowell, At your 'How to Grow Pink Oyster on a block of
straw' page, there is no information on what to do BEFORE the
straw is in the bag.--There should be. The site was
originally made for folks who buy kits from me. To make a kit
yourself, just cook straw at 160-180 degrees f. for one to
two hours. (I use a hardware cloth basket that just fits inside a
food grade 55 gallon drum, and heat it with a weed burner, to make
9 in a batch.) Cool to <100°ree;f. and innoculate with grain
spawn at a rate of 5 to 20%, wet spawn to dry straw. Keep
everything, including your hands, clean with >90% alchohol.
Break clumps of grain apart; a clump has the same effect as a
single grain, so breaking a clump into grains multiplies its
effect. Distribute kernels of grain spawn throughout straw as
evenly as possible. Pack into 18"x24" poly bags. Then follow
instructions on the website. When I'm not using spawn I expanded,
I buy it from Local suppliers; N.W. Mycological Consultants
or from Fungi Perfecti. When I buy $60-$100 worth of spawn at a
time, it costs me about $2 per bag of straw for spawn . It costs
$10 or $15 to ship one or two bags of spawn. I'll do what I can to
encourage you to try this. Watching the mushrooms grow is
fascinating. Watching people's reactions to the fresh mushrooms is
also fun.
Where do you get the hardware cloth basket? do you make it?--I
make the basket from the type of hardware cloth used in the bottom
of a rabbit hutch. It's strong and can be tied into the shape of a
cylinder with tie wire. #9 tie wire can be used to form handles.
Make the cylinder just smaller than the drum. Cut two circles from
the hardware cloth for the top and bottom.
I hope you don't mind the constant ?'s I was wondering why
the Pleurotus Ostreatus are always long stemmed and the
Columbinus grow in a beautiful full bunch. Can I control the
Ostreatus somehow? When does a person add that dolomite lime
stuff? I feel that the customers won't like long stems and
little tops.They are different species. The florida strain
of ostreatus fruits more like the columbinus. The tendency to grow
long stems is often the result of high carbon dioxide levels.
Better ventilation and more light would result in no stems and
thicker fruiting bodies. Let one of them fruit outdoors and see
what you get. They are thick and meaty mushrooms when they grow
outdoors.
You may visit the Kitsap Peninsula
Mycological Society's Mushroom Cultivation website.
Learn more about the Kitsap
Peninsula Mycological Society at their website.
This site is maintained by Lowell Dietz. Mushroom cultivation
is my hobby. I make my living doing carpentry in Sequim.
You may view my carpentry website at:http://dietzfarm.com/carpentry.html.